 Resident Evil 5 - The Solution pt.5
Fifth round with the Resident Evil 5 walkthrough. Have fun.
Chapter 5.1
Go left around the flower garden to find a Scarab Jewel near the Cleansing Waters, then go up the ladder nearby and drop down another one that will take you into a tunnel. Examine a document just to the left of the door before going through it.
First enter the door on the left to find some chests, munitions, incendiary grenades and some documents. Go back into the corridor and take thegreen grass before entering the room with the flowers. Take the munitions in the corner and go out the door.
Follow the corridor to the valve which can be turned to open a door. Pull the lever inside to open a shutter which will reveal a glass window. Use the knife to continue down the corridor. When you reach the caged animals, examine exactly the opposite corner to find agreen grass, then head down into the nearby corridor with the shotgun ready, as some Lickers will break the window to attack you. You can decide to kill them all, but it would really be a useless waste of munitions and there is no certainty that you can do it. It is easier, however, to run down the corridor to a door that you will be able to open with teamwork, then examine the elevator and call it. In the meantime, turn around and try to keep the Lickers away (throwing a grenade is a great solution). As soon as the elevator is there, get on board and use team play to get out of there asap.
Once out of the elevator, continue straight, collecting more munitions you can and then head through the corridor where another boss battle awaits you. Be sure to dodge his first attack during the cutscene to avoid taking damage.
The battle is pretty simple. Start by aiming for the softer red parts in the middle of its forelegs (the shotgun is the best weapon on these occasions, but the others work just fine too). Try to stay as close to his paw as possible, to avoid as many attacks as possible. After a few hits, the boss will fall to the ground stunned. Get close to his head and deal as much damage to him as you can (if you have grenades, just get close and press the button that will appear to place one in his mouth and cause him a lot of damage). If you don't have any explosives, shoot them with the most powerful weapon in your inventory. Then do it all again until the battle is over. You will also find a grenade and agreen grass, surrounding the central structure.
Occasionally, this boss may "throw" a horde of flying insects at you; don't worry about them that much. But if you are short of munitions, killing them might be a good idea to "recharge" you. Apart from that, the only attack you need to worry about (as long as you are far enough away from its mouth) is its claw, but you can dodge it by simply pressing the button that will appear on the screen.
Chapter 5.2
Cross the bridge ahead and continue through the door. Open some boxes on the right and then go through another door. Now things get a little more complex, as the enemies will have weapons and can take you out in seconds. Hence, taking cover is essential. Go down the stairs and cover behind the two crates and use the gun to kill the three enemies ahead (initially, shoot them once each to slow them down, then rage). Killed these, go through the door ahead and take cover on either side to take out some enemies that will appear later. A clean sweep, pick up thegreen grass from the chest and proceed through another door.
Immediately after, take cover in the corner just ahead and take out the gunner on the right. But there is one more left: wait for him to stop shooting, then move right to take him out. Proceed and take cover on the crates just ahead to cover yourself from other incoming enemies. Once they are all gone, look for some munitions on the left side of the room and a small passage a little further on, on the same side. As you enter, get ready for an enemy who will drop down the broken stairs a little further on, then turn left to find some boxes and anred grass.
Then, use team play to open the door and exit.
Open some boxes ahead and approach the next corner. There will be several machine gunners and an enemy running towards you. It is quite difficult to eliminate him trying to enslave the shots of the machine gunners, so it is better to go back to the corridor and kill that single enemy as he turns the corner (beware of the parasite that will come out of his body). Eliminated, take cover on the aforementioned corner and eliminate the nearest gunner, then another one further behind. Killed the first two, move to the right to be able to eliminate a third on the left. If you have a sniper rifle, you can also aim a quarter of it, visible between the space of the metal plates.
Killed everyone, open the various boxes on either side of the lower floor and then go up the ladder to the right and take cover on the protruding wall just ahead. Immediately hit an explosive barrel to the left to take out a group of enemies intent on reaching you, then silence nearby gunners. Others will be waiting for you a little further on, after the space (the best thing will be to run and cover you with the boxes in the opposite direction to theirs and then shoot the explosive barrel to eliminate them instantly). Then take the elevator and you will reach an even lower floor.
Head to the end of the street and open a couple of boxes before jumping to the floor below. Immediately take out a couple of enemies on your left and immediately take cover on the iron wall. Look out to eliminate the enemies you can see and then move to the other wall to the left to be able to kill the rest. Bear in mind that one of these enemies will keep throwing flash grenades at you (they won't hurt you, but they're pretty boring). With the calmer situation, go up the ladder and jump to the opposite side.
Once you jump, head to some crates to the left, but take out the grenade launcher on the stairs to the left before opening them. So go to the opposite side, get on the platform and then on the conveyor belt. Run to the center to avoid the various boxes and then go up to the right.
Ignore the lever and go up the stairs to a gate that you can break down with Sheva. Inside, quickly grab agreen grass, munitions and open a chest. Now, before climbing back onto the conveyor belt, take out an enemy on the nearby walkway and then jump off. Always stay in the center of the belt and take out the various enemies on the walkways above you (use the explosive barrels to kill the enemy on the central one). Shortly before the end, several enemies will run towards you from the front (use the explosive barrels they will run close to, to make a clean sweep in an instant).
Then go up to the platform on the left and go down the stairs.
At the very end of the staircase, look for some boxes adjacent to it and then continue straight to find a fire grenade and a SIG 556 MG inside a briefcase on the tables ahead. Go up the ladder and ignore the switch at the moment (you'll have to turn the electricity back on first), then turn right and go up again. Head forward and go down some stairs then continue along the path (you will find some munitions). After climbing another ladder, you will find a couple of buttons; For the moment, leave them alone and instead pick up thered grass and the contents of the four boxes a little further on. Now, use team play to press the buttons, so that the previously ignored button can work again.
Go back the same way, but you will be blocked by a new type of monster-bug. This guy is very deadly and only one attack will be enough to take you out. The important thing is to always keep a certain distance between you and him. So aim for the bright spot in front of him and keep shooting until he comes down. Once he's gone, grab the stone he'll drop and continue to the button.
Once the button is activated, the conveyor belt will activate. Wait for a crate to pass, climb on it, run to the other side and climb to a platform to the right. Watch out for the bodies along the way, the ones that are still moving, will grab you and cannot be killed. And if you are looking for treasure, you can find one Necklace which will be carried back and forth by the belt, on the furthest part.
Consequently, open a couple of crates and go up the stairs to the door.
After you get off the ledge, open the boxes on the right and take the munitions from the farthest corner. Then use the teamwork to get through the door and get ready for another boss.
The battle will be very similar to the one you have already faced against this monster. Instead of the incinerator room, however, you will have to use the flamethrower that you find on the wall opposite the chair. The only problem is that you will have to wait for it to recharge and the process takes about a minute. In the meantime, keep your distance from the boss (it's very slow, but more rematerialize everywhere, although it's easy to see where it will go) and take some time to use the explosive barrels as in the other chapter. Roll one towards him so that he absorbs it.
So take the flamethrower as soon as it is loaded and use it on the absorbed barrel, initially, and then on his whole body, aiming for the more colored joints. Do not stop until you have finished the "charge" and then reposition it on the wall so that it can recharge again. Now, another barrel, another wait. In short, repeat everything. When you run out of barrels, keep shooting him with the flamethrower (he should have taken a lot of damage and so it shouldn't take long to finish him). As for his attacks, you can avoid them by standing at a certain distance or by pressing the buttons that will appear on the screen.
Chapter 5.3
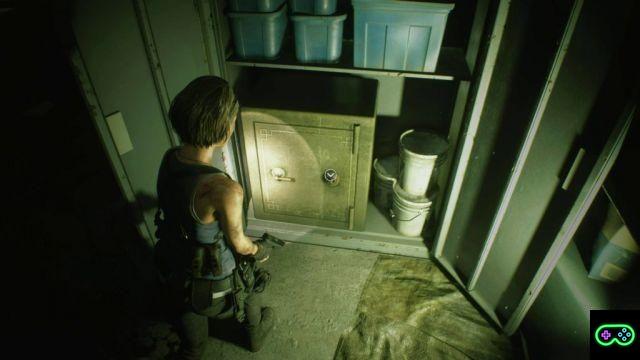
With the boss eliminated, exit the northernmost door and go up the stairs to a crossroads. Head left first to find one Sapphire inside a safe and some munitions; then go back and go right and pick up the munitions before going out the furthest door.
Turn right for some crates, then continue down the corridor to a yellow door. Cover up immediately and take out the two gunners on the catwalks. If you need munitions, you can find them in the boxes on the right. Killed the gunners, continue and follow the road to the next wall, cover and take out two more enemies. Soon after, another insect-monster will arrive from the ceiling; kill her by immediately targeting the white spots in front and behind.
Run to the next cover and stay there: even if you will not be able to aim at the gunners on the walkway beyond the wall, it is better that you focus on the various enemies that will come towards you from the walkway a little further on. Once they are eliminated, it's up to the machine gunners. Consequently, skip the space at the bottom and continue to a yellow door which will lead to a small room where you will find munitions, for an H&K PSG inside a case and a lever that you will have to pull to activate a console right outside.
With the console turned on, head back outside and another insect-monster will pop up behind your back. Turn around and take it out like the others. As you approach the console, several enemies will arrive on a platform that is coming to you. Use your shotgun and take them out from where you are (aim at the two with the TNT first and then at the bigger one). If you can't kill them all, before the platform arrives, go back a few rooms and take them out from a distance.
Once the sweep is cleared, only one of you will be able to use the platform. It would be better to send Sheva, so that you can cover her properly from a distance. First aim for a gunner on the right (it may be difficult to spot) and keep two other enemies away while she pulls a lever, so that the platform comes back to you, allowing you to pass.
After the space, follow the walkway on the right for a few boxes and then head to the opposite side; as you do this, several enemies, including rocket launchers, will appear on the catwalk opposite yours. Cover yourself with the wall ahead, on the left, and take out some enemies that come to your side. Once eliminated, break away from the wall (but don't reveal yourself) and, with your trusty sniper rifle, kill the rocket launchers one at a time (they have armor to protect the torso, aim for the legs).
When they are all dead, continue on your way to a small control room, but don't enter the door. Instead, follow the walkway that will allow you to reach a series of windows, from which you can eliminate the enemies inside (a grenade or two, will ensure a quick victory. Otherwise, use what you have available). Be very careful, though. Enemies could escape from the room you passed earlier (the control room) and take you by surprise. When you're done, go inside and retrieve agreen grass and a Regal Necklace, then go out the door and continue to a corridor and then another.
Take thegreen grass ahead and open the crates before going down the spiral stairs that lead to a circular platform. Turn right and use team play to press the buttons at the same time. This will activate the platform which will begin to climb up to the top floor of the room. Unfortunately, your journey will be interrupted several times by enemies blocking the platform and others scattered around the platforms surrounding the one you are on. They will be equipped with weapons, so it's best to take cover from the center column and take out each enemy one at a time, making sure you regain your position behind your cover after each kill. Once you get to the top, four more enemies will try to attack you. Use the column once more and look out from both sides to kill them. When all is done, follow the walkway to the door.
Follow the tunnel to the ruins. Explore the area for various items: two crates near the elevator on the left, near the destroyed bridge and a couple more next to the blocked building (also take the munitions behind the elevator). The goal is to get the elevator down, but the controls are inside the locked room. To get there, you will need to activate the elevator with the lever near the bridge and go down into the room from the roof.
If you are in charge of the elevator, you will need to take care of two Lickers (grenades or shotguns should solve the problem). And now things get interesting. Anyone who has entered the elevator will have to push a caisson opening an entrance way to the blocked room. The problem is that a lot of Lickers will attack whoever pushes the box. But there is one thing: as long as you are hooked to the crate and keep pushing it relentlessly, the Lickers shouldn't be able to catch up with you. It will take about a minute to fully push it, so don't panic. Once this is done, enter the hole on your right and immediately pull the lever on the right to lower the elevator. Now run out of that room, cross the bridge to the door (don't stop, the Lickers will be breathing down your neck). In case you sent Sheva to pull her lever, make sure you give her a good help from above with your sniper rifle.
Open the door, tadà! It's Albert Wesker and he doesn't seem to have good intentions. What you basically need to do is stay alive for 7 minutes. There is no reason to try to beat Wesker or Jill, directly, because both are invincible. Focus on avoiding their attacks and not dying and you will be rewarded only a few minutes later. The simplest way to do this is to go around the room behind the pillars, stop and turn the other way, continuously. Thanks to your constant spinning, Wesker should remain in the center of the room, allowing you to be safe. As for Jill, she too will have trouble catching you with her weapon, due to your constant movement. Obviously, this method isn't much fun but it will allow you to get past Jill and Wesker without wasting a single ammo.
After seven minutes, you'll have to fight Jill, but don't shoot her. The goal, in fact, is not to kill her, but to take her luminous object on her chest. Meet her on the main floor (where you walk around) and try to approach her from behind. A "sequence" should appear, giving you a chance to grab it; now quickly press A or X (Xbox 360) to hold it steady and give Sheva a chance to grab the item. Likewise, if Sheva is blocking it, press A or X quickly to try and tear the object yourself. Occasionally, you can stink Jill. Then quickly press the buttons that appear to grab the item. Repeat this until you succeed in the undertaking (it may take a few minutes).
Δ
![[Video-Soluzione] Resident Evil: Operation Raccoon City](/images/posts/37afceb623c5796f56ae56e35ef61eb3-0.jpg)
![[Sbloccabili] Resident Evil: Revelations](/images/posts/c9289e7c8fa29cc9f9bfb16330ade194-0.jpg)

![[Weapons Guide] Resident Evil 5](/images/posts/977d1cfb46cada17f4cb56c6589ac40e-0.jpg)
![[Trofei-PS3] Resident Evil 4 & Resident Evil Code Veronica HD](/images/posts/78a0a21001dac2bd106512a6df1416ac-0.jpg)


![[Obiettivi-Xbox360] Resident Evil: Code Veronica X HD](/images/posts/a8ca50034a7467052ecc79df748c81ef-0.jpg)